Aug 31, 2016

SSS Monday: It's A Stitch up

Happy Wednesday, I made a card for SSS Monday Challenge : It's A Stitch up. When I saw the challenge name, it reminds me this stamp set and I really want to play with it. 

I am using Hero Arts CL397 Sew Original and CL429 Simple Handmade. I stamped the stitch hearts to create the top and bottom border with white ink on Kraft CS. Then I stamped the spools and cute buttons in white and I color them with grey Copic marker to make a frame around the images. Adhere on a piece of grey card base.

I gold emboss the scissor, cut it out and foam pop on card front. 

I stitch the bottom edge of the card base with twine. Love how it turn out. I am not very good with sewing and I am glad I jump into and did the stitch.


Please click the link below to play along.

Simon Says Monday Challenge: It’s A Stitch Up


 Will Enter this one to STAMPlorations CAS card:Gold too.

Supply List: 
Stamp: Hero Arts CL397 Sew Original & CL429 Simple Handmade
Ink: Papertrey Ink- Fresh snow & True Black
Die: Spellbinders -
Gold Embossing powder, Twine, Copic marker

Thanks for stopping by. Nicky~~

Stamplogrations Gold&Theme

Hi I made this card for 2 challenges. Click the link to check out the detail on their blogs. Today is the last day to enter these August challenges but the best part is: a new one is coming up. I can't wait. Hope you can fine some time to play along. 

Here is my card. I used Hero Arts Layering hibiscus stamp set. I learn this coloring technique from Marika Rahtu of Me and Minime Crafting. Her coloring skill just took my breath away. So pretty. I LOVE her card. 

I am in love with this coloring technique. I had a lot of fun and I hope you are inspired to try it.


I chose only use 2 layers. I stamped the first layer with Distress ink Broken China on water color paper. Use brush and water to soften the stamped image. when it still wet I stamp the 2nd layer with Distress ink Stormy Sky then let dry. Stamp the center with black ink.

I also highlight the hibiscus with black color pencil. 
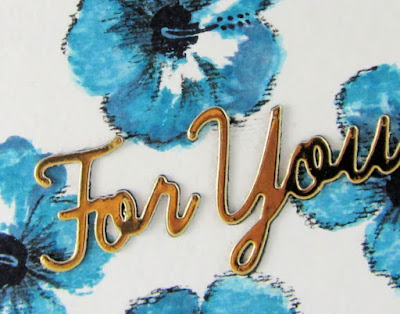
I die cut the sentiment from Spellbinders Phrase Set Two with gold paper and another 2 layer of black die cuts. Amount them all together and adhere on card front. 


Here is the close up of the gold die cut sentiment. 


  I am inspired by the theme stamp&Pencil also the Hibiscus.


Supply List:
Stamp: Hero Arts CL868 Layering Hibiscus
Die: Spellbinders Phrase Set Two
Distress ink : Broken China, Stormy Sky, Black
Color pencil, Gold paper

Thanks for visiting. Nicky ~~

Aug 29, 2016

SSS Wednesday + CFC155

Hi I have a quick post of Simon Says Stamp Wednesday Challenge: It's Hip To be Square
I also submit this one for CFC155: Black & White with a pop of color


I want a clean card. I was talk about my beautiful blue hydrangea with a dear friend and it inspired me to make this card. Since my hydrangea is blue , I use PTI's Hawaiian Short on my sentiment. I also add 3 punch out butterflies on the card. I like the final look. I hope you like it too.


Supply
Stamp: Hero Arts K5376 Hydrangea,  CL142 Thank you
Ink: PTI: True Black, Hawaiian Short
Punch: Martha Steward

Thanks for visiting, Nicky~~

Aug 28, 2016

Simon Says Stamp Monday Challenge - Go Fish

Hi, I have a quick post. 

I made this card for Simon Says Stamp Monday Challenge - Go Fish
You have until Monday to uploan your creations to play along. Here is my card.

I am using Hero Arts Ocean of Joy stamp set. 

I use cuttlebug emboss folder: Tiny Bubbles to create the background.

I colored water color paper with all sorts of color and let it dry. I stamped the fishes with black ink and cut out with scissor. I use foam tape to pop 3 fishes on card front.  Also Stamp the sentiment on light blue CS and mounted it on black CS.


Supply List:
Stamp - Hero Arts : Ocean of Joy
Embossing folder - Cuttlebug: Tiny Bubbles

Wish you have a nice weekend. Thanks for visiting. Nicky ~

Aug 25, 2016

PTI August 2016 Blog Hop Challenge

Hi , I made this card for PTI August 2016 Blog Hop Challenge. I am inspired by the color combination.  Love the soft color blend together. Here is my card. 

I die cut lots of flowers from Garden Garland die from Melon Berry, Sweet Blush, White,  Kraft CS and arrange them on Cream card base. I also die cut the sentiment from Black CS and dots from Dark Chocolate CS. I like how the flowers "flying" on the card. 

I just realized this is a no stamp/ all die cut card. :) (All die cuts --I LOVE the sentiment die. Did I say LOVE. Hahaha I did.) 

Here you can see the close up of the die cut sentiment Thanks from Wet Paint die collection set. I die cut 3 sentiments and stack them together to create dimension .


Here is the photo for inspiration. 

Leave a comment and let me know you are here. Thanks for visiting, Nicky ~

Aug 23, 2016

PTI MAKE IT MONDAY #258: Cover Plate Tags

I made this card for PTI MAKE IT MONDAY #258: Cover Plate Tags. Want to know how this one is made, you can click the link to watch the video. 


My husband is going golf with a good friend on Monday. I plan to attach this tag on a bag of snack to surprise him. 
I use On the Links stamp set. I like the kraft pattern on cream card stock. He has a purple golf bag so I decide to use Winter Wisteria to stamp on die cut golf bag. 

Also I stamp the sentiment, You're A PRO! from the same stamp set on a piece of trip, cut two end and pop them with foam tape. 


Supply List: All Papertrey Ink
Stamp + Die:On the Link 
Cover Plate: Quatrefoil Die, Tag Sales#3
Ink: True Black, Winter Wistreria

Thanks for Visiting. Nicky~~

Aug 20, 2016

PTI Create ALONG WITH US

Hi This is a card I made for PTI Create ALONG WITH US

I am inspired by Betsy Velaman's beautiful card (Last one) on her August Release Wrap Up post. I love the simple color yet so powerful design. Here is my card.


I made my card using Harvest Berries Dies. I die cut leaves from white card stock and arranged them on craft card stock. Whit embossed the sentiment from 2016 SAF set [Art with Heart]. Beautiful sentiment , love it. 


I like this design so much so I decided to make another one. Instead die cut I stamped the leaves and berries with white ink on craft card stock.This one is perfect for one of my artsy friend. I know this card will put smile on her.

You have until 6am, Monday, August 22 to play along.
Thanks for visiting.  Nicky ~~

Aug 19, 2016

Eat Cupcake

Who doesn't like cupcake~! :) A cute card for a friend who is passion about baking. She is always learning something new, trying new technique/recipe and more way to decorate her beautiful creations. I want to use a baking related image to represent her. I think this cupcake is just the right one for her. PS:This sentiment is too cute and perfect for the cupcake.


I repeat stamped the sentiment with white ink on craft card stock to create the background and also heat emboss with black embossing powder to create a focal point.

I stamp the cupcake with Memento ink and color with Copic Marker. Cut out and adhesive with foam tape on the front. 

 I love the pink sprinkles. Cute ~ cute~ cute~

Thanks for visiting.  Nicky ~

Aug 17, 2016

Smile in an Envelope

Hi This is my long over due post. I took a long break to focus on my family. I sincerely apologize not being able to keep up and I never officially announce my break. Honestly I didn't intend to. After visiting my old posts and I realized I can never put my passion of handmade crafting aside. I want to keep creating and sharing. 

Here I am. Restart my blog from a new name: Smile in an Envelope
This name reminds me how I start to make handmade cards --- I love the smiles on my friend's faces when they open my cards. 
I want my cards carry my love and put smile in the envelope.


I want to dedicate this post to a dear friend. I made this crown for her daughter's 1st birthday. I had so much fun creating this beautiful crown. Everything in the photo is handmade. 

I cut out the crown template and number 1 using Cricut machine. Hand trim pink felt and glitter paper and glue them together. 

YES, I made those roses. Pure handmade. 

I can't find the roses that achieve my preference in the craft stores,  I decide to make my own by using Die cuts (or punch if you like). It is not easy to make it "look like a real rose" for the first few tries. After I figure out the order to place the petals and it turn out to be a fun and beautiful project. 

Happy Birthday, little princess.
Thanks for visiting. Nicky ~