Jul 29, 2010

Second post today

Continue the Paris post.
Third one. I submit for Paper Craft Go-to Sketch#5 This is a fun sketch. Give it a try. You have until Aug 02 to submit. This one is quick and easy. I love the pattern paper again cork. I am inspired by Ashely's Down hill bicycle card here.

I round the vintage cream card base from PTI. Die cut big circle from pattern paper called Linen closet from Die cut with a view. Die cut small circle from cork. (I got mine from Michael's with the 40%off coupon. YA~) Stamp sentiment with water mark ink and white embossing it. Stamp Eiffel Tower with Vintage photo Distress ink. Mat with the big circle and adhere on card base. Tie 3 twines together and add embellishment with glue dots.
Close up to see the cork. It's easy to trim,  die cut and stamp. The same as you will do on the paper. I do be more gentle when I run it through my Big shot. You don't want to crumble the edge.
Last one is for Hero Arts another theme, Food. See the chocolate? Today is the last day you can enter the theme, Food and Travel. If you do find time to do some craft. Make sure to upload before 11:59 PST to Hero Arts Flickr page and tag with July2010B. You can win a $50 shopping spree. Also I use 2S4Y's Laura's sketch57.

Ink up the edge of card base. Trim rectangle kraft panel. Trim two rectangle panels of pattern paper from October Afternoon, Thrift shop. Pierce around the panel, adhere on kraft panel. Cut two panels of vintage cream card stock. Stamp chocolate and ink up the edge. Stamp Chocolate again on pattern paper and cut out the top and bottom, adhere on focal image. Color the box with markers. Pop off  with foam type. Stamp the Merci, ink edge, adhere. Tie ribbon, lace and adhere on kraft panel. Mat the panel on card base. Add embellishment.
Close up , I add Glossy accent on the chocolate. Don't they look yummy?

I also make a book tag for the one and I plan to give it to a friend who loves chocolate and reading.

Hero Arts Paris set

Hello everyone, this is an excited day. First I want to share a BIG news with you. I am Hero Arts Nancy's Win a day Pick. I am so honored and excited. Can't wait to get started.

Today I want to share a card set I've been working on for few day. I focus on my new stamp set, Paris from Hero arts. I enter these for HA July theme, Travel and Moxie Fab World's Card style week Challenge. You have until Aug 02 to enter your card,there is still time and I hope you can play along.(I just realized it's a too long post. I will move two cards to another post.)
First one, this is my favorite of all. I am not too shabby and vintage girl and this is a challenge for myself to try a different style. I really like how it turn out.

I trim pattern paper panel from a set, Le Creme from Die cut with a view, adhere on vintage cream card base from Papertrey Ink. Ink edge. Cut a slit on top of the card, thread lace and adhere. Trim a rectangle card stock, stamp lace background with Vintage linen Distress ink and Eiffel Tower with Black soot Distress ink. Ink edge with Vintage Linen and Tea dye Distress ink. Pop off the focal image with foam type on card front. Stamp Merci with Midnight black pigment ink. Add gems.

Second, This is my second try. I don't like the first card so I keep the same design and layout just change the color to come up with this one. This is my first time try on the Collage-stamping. I am inspired by carol's cards here. She is the queen of Collage stamping. Check out this card here. Absolutely stunning.

I use Distress inks in this card. I start tamp the Eiffel Tower and sentiment with Vintage photo and clear embossing them on white PTI card base. Stamp the big butterfly with watermark ink and clear emboss. Stamp the lace background, Starburst lace, Old letter writing, butterflies from Antiques Engravings with different ink on the card. Ink edge with Antique linen and Tea dye. Wipe off the extra ink on embossed images with baby wipe. Tie on twine and adhere lace. Adhere the panel on PTI kraft card base. Combine brad and flower, adhere on card front.

 Here is the "Failed" card. I use white embossing powder on the sentiments and Eiffel Tower. They didn't pop as I expect.You can barely see , Paris. So I call it a fail. Just want to put this one on so you can compare with the one I like. 

Fabulous Ashely Newell, my all time favorite designer. She shares great tips of how to photo your project on her blog , A New Design. You don't want to miss this. I tried her tips and adjust my photo routine. Let me tell you, it really works. Don't you think my photos look a lot better.

Thank for stopping by and have a great day.

Jul 28, 2010

Card Style: Classy &Elegant

Moxie Fab world's Card style week No matter what style you are, pick a style and play along. There are 4 category. Click to read the detail about how to enter your project.
  • Classy&Elegant
  • Fun&Cute
  • Shabby&Vintage
  • Clean&Graphic
Here is my take on Classy&Elegant.
First one, I want to play with some pattern paper and Die-cut shapes. I trim the pattern paper, adhere the ribbons and mat on black card base. Die cut label from pattern paper, adhere on label.  Die cut a circle and stamp flourish and sentiment. Ink edges of a Die-cut circle frame. Mat the stamped circle. Adhere the focal imagine on card front. Pop off the die-cut heart with foam type. Glue bow.
Second one, I make this one for a dear friend who always gives me encourage and support when I am in a blue mood. She is such a positive and sweet person. Always with a big smile and gives me lots of laugh. So sad she lives in another state and I don't get to see her very often. I am glad she updates her family picture monthly so I get to see her and her beautiful family all the time.
I had a really hard time earlier and she really talks me out. I want to give her this card to show how much I appreciate her friendship. I also enter this one for Simon says Dotty challenge.

I trim the pink polka dot pattern paper and adhere on kraft card base. Punch two borders , Martha Stewart Lace heart border punch from white cardstock and EK success scalloped scallop edger punch from stamped kraft cardstock. Adhere them on card base. Tie on ribbon. Die cut label and stamp the tea cup, label and sentiments. Ink edge and adhere at card front. Ink the tea filter and add pink mosaic gems.

Thanks for stopping by and whih you have a great day.
Hugs,
Nicky

Supplies:

{Je t’aime}:
Card stock: (Walnut cream, Blackbird) Bazzill Basic Paper  Pattern paper: (Wedding)Making memory;  (Black & Ivory Fusion)K&Company   Die-Cut Cardstock:(Elegance)K&Company  Clear Stamp: (Flourish from Valentine Flourishes; Sentiment from Love many ways)Hero Arts  Pigment ink: (midnight black, wheat)Tsukineko  Dye ink: (Vintage photo, Antique linen)Ranger industries  Die: (Label8, Circle) Spellbinders  Accents: (ribbon, gems) 
Finish size:4¼”x5½”


{Thinking of you friend}
Card stock: (Pink, kraft, coconut, Walnut cream) Bazzill Basic Paper  Pattern paper:(Color basics-Red)Me&my big ideas  Clear Stamp: (Polka dot from Polka Dot Basics II, Tea for Two Additions)Papertrey Ink  Pigment ink: (coffee bean, midnight black, pixie dust, cloud white)Tsukineko  Dye ink: (Vintage photo, Antique linen)Ranger industries  Die: (Label8) Spellbinders  Edger Punch: (Lace heart)Martha Stewart; (Scalloped Scallop)EK Success  Accents: (ribbon, pink mosaic gems)
Finish size:4¼”x5½” 

Kids cards

Hi everyone, I have a fun and cute kids card set to share today. This is made for Jennifer McGuire's kids card drive and this is on going. Details, click Here. Please join me to send out some love and laugh to cheer up the sick kids and family.

First set I use Penny Black, -->two cats from Purrfect day , a Cat from Nine lives ,and the mouse from Its your day There are  tuns of cute animals in these sets and they are really good for making cute and fun cards for kids. I try to keep the cards colorful, fun and simple. 

I use kraft card base and different colorful pattern papers. Some border punches and each one has their initial chipboard at card front.


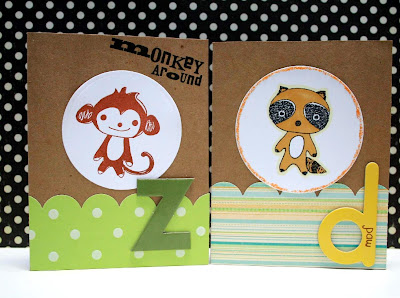
Next set, I am playing with my new BasicGrey stamp Oliver Stamp - Monkey Around and Little Piggy(Click the name to lead you to Two peas website). They are just too cute. Kids love animals and these make great kids card as well.
 
The piggy set. Good for boys and girls. I color it and paper piecing it. Lot's of glitter on the ring.

The kitty set. Left, I stamp the cat with pink ink on die cut circle and use black pen to frame the imagine. Lots of pink Stickles on the ring again. For the right one, I stamp the cat in black on rectangle pattern paper. They also have their initial chipboard and sticker at card front.


The wild animal set. I made these two for boys. Aren't the monkey and raccoon cute?  
 
And finally, the cutest set for the youngest two. I want then to be super colorful and I spell their names on the card front with stickers.
I think it will be more fun to send out the cards from my cat Hana to them and I let her sign the card in side with a cute message. Thanks for stopping by today and I hope these cards give them smile and also give you smile.

Jul 27, 2010

PC Inspired Style and Clean&Simple

Happy Tuesday!! I hope everyone have a good Monday and no matter how blue it was, just left it behind.

Today I want to share a card I for two challenge. Oh~ I miss taking challenges. I made this card for Paper craft Inspired Style Challenge and to cooperate a typewriter in the project. I pull out my just arrived October Afternoon pack. I think the pink typewriter is just right for this challenge.
I use sketch from Clean & Simple stamping. They are celebrating the 100th sketch and there is a fun blog hop. Make sure to hop over for lots of inspiring cards.
 Made the card base. Punch border and ink up the edge. Trim pattern paper and adhere on top and bottom of card base. Peel off stickers and put on a scrip paper. Trim off with scissor and pop off  on card front with foam type. Highlight "L O V E"with marker and glossy accent. Tie on twill.


Close up to see the detail. Thank for looking.


Supplies:
Cardstock:(Vintage cream)PTI
Pattern paper:(Thrift Shop)October Afternoon
Stamp:(Thinking of You Messages) Hero arts
Ink:Tea Dye, Antique Linen (Ranger), (Midnight black)Tsukineko
Sticker:October Afternoon
Border Punch:(Double Embossed Dotted )EK Success
Twill :(Lemon Tart)PTI
Accent: Glossy accent, Foam type

Jul 23, 2010

Last day of Xmas week.

Happy Friday. Today is the last of my Christmas week and I hope you have fun.

First card I use Joyeux noel, and Winter bough. I stamp Winter bough with midnight black on kraft card base. Then I stamp Joyeux noel with watermark ink and emboss with detail black embossing powder on a Scarlet cardstock. Mat on black cardstock and adhere on card front.

Close up to see the embossed imagine.

Second, I pair Joyeux noel and Adornment . I stamp the Adornment with Galaxy gold on white cardstock. Then I stamp the Joyeux noel with watermark ink and emboss with gold embossing powder on Scarlet cardstock. Mat on black cardstock and adhere on card front.
 Close up.

Third one, Winter bough, Christmas Flourish and Letter background. I trim rectangle BasicGrey pattern paper and adhere on card base. Die cut circle and stamp the background with Tea dye distress ink. Stamp Winter bough with Rocket red gold. Stamp sentiment with Graphite black and clear emboss. Ink the edge with more distress ink and adhere on card front.
Close up.

Final card is Joyeux noel, and Winter bough again. This time I turn to a cold tone. I stamp Winter bough with watermark ink and emboss with white embossing powder. Use blending tool to ink the edge with Stormy sky and Weather wood distress ink. Die cut ovals of pattern paper. White emboss the Joyeux noel and ink the edge. Use foam type to pop off on a bigger die-cut oval of pattern paper. Adhere the focal point on card front. Add glitter glue.
 
Close up to see the glitter.
I want to thank you everyone for joining me for a week long Christmas project. Thank you for all your sweet comment. Have a nice weekend and have fun in Summer.

Hugs,
Nicky

Jul 22, 2010

Day 4 One layer card

One layer , easy to mail and easy to mass-produced.
If you are worried about the extra mailing charge because of the jutted embellishments, today's project is just for you.
First one, I want to show off the beautiful Christmas flourish sentiment stamp. I stamp the Crystal wreath with white Cloud white on kraft card base and stamp the sentiment with Midnight black. Frame the edge with two way glue pen and sprinkle glitter.
Close up of the beautiful sentiment. With a beautiful sentiment stamp, it is easy to create clean and elegant card. Gives the card a great look. Did I mentioned this is my favorite? 

Second one I stamp the Crystal wreath three times with watermark ink and clear embossed. I use 1/8 "score type and line up on top and bottom of the card base. Sprinkle the glitter. I draw the white lines to high light the glitter part. Stamp the sentiment from Crystalline set with midnight black. 
Close up of the emboss part. Clear emboss on kraft is so clean and beautiful. Simple show the beauty of the wreath.
 

This one is so quick and easy. If you like to use pattern paper, this one can really show off the patterns. I trim the pattern paper and adhere on red card base. Stamp the sentiment with Midnight black. Add gems.
 
Close up of my favorite sentiment stamp again.

The next two are a card set. I use the same stamps in different color tune. With the same design by changes the color tune can give the card a whole new look.
First one I stamp the letter background with watermark ink and stamp the Winter Bough with Rocket red gold on Grey cardsotck. Mat on card base. Stamp the sentiment with Midnight black. Add Fire brick Stickles here and there.
Close up to see the Stickles on the flourish imagine.

This one I stamp the letter background with Antique Linen Distress ink and stamp the Winter Bough with Rocket red gold on cream cardsotck. Adhere on red cardstock. Ink the edge with Antique and Tea dye Distress ink. Stamp the sentiment on trimmed whit cardstock with Midnight black. Ink the edge as well and adhere on card front. Add Gloden rod Stickles here and there.
Close up to see the Stickles on the flourish imagine

Jul 21, 2010

Day 3 Pattern paper Christmas

Hello everyone. I hope you star to get into the mood for Christmas. I have two cards to share today. If you have lots of beautiful pattern paper, pull them out and play around.

First one, I play with some pattern paper. I trim two different pattern paper and mat on card base. Die cut the circle of Grey cardstock and stamp the Adornment with watermark ink. White embossing it. Adhere on die cut scallop oval of white cardstock. Adhere on card front. Die cut label and stamp sentiment and snow flake with two different Grey ink. Tie twine around the card and attach snowflake embellishment and gem. Add glue and sprinkle flower soft here and there on adornment.

Close up to see the flower soft. 

Second card I want to do some bold color. I trim the black polka dot pattern paper and adhere on black card base. Punch two borders of white cardstock and adhere on cardbase. Cut slits and tie on ribbons. For the focal point. I die cut circle of white cardstock and stamp the Crystal wreath with Rocket red. Mat on die cut scallop circle of red cardstock. Adhere at card front. Add glitter. Stamp sentiments with midnight black. 

Close up of the glitter.

-->
{Let it snow}
Supplies:
Stamp:( Adornment, Crystalline)Penny Black, Chalk Ink:(Aegean Blue)Tsukineko, Watermark ink: Tsukineko , Pattern paper:(Black & Ivory Fusion)K&Company, Cardstock: (Grey, White), Dies: (Circle, Petit Scallop oval, Tags), Accents: (Diamond Stickles)Ranger industry, (White emboss powder) Joann, (Twine)May Art, (Snowflake embellish) Making Memories, (Gems)Michaels, Polar white Flower soft
Finish size: 4¼”x5 ½”
-->
{Red crystal wreath}
Supplies:
Stamp:(Crystal wreath, Crystalline)Penny Black, Chalk Ink:(Midnight black, Rocket red)Tsukineko,  Pattern paper:( Le Creme)Die cut with my view, Cardstock:(White, Black, Red), Dies:(Circle, Scallop circle) Spellbinders, Border Punch:( Diamond Lace) EK success, Accents:(Ribbon, Glitter) Michaels,
Finish size: 4¼”x5 ½”

Jul 20, 2010

Day 2 Adornment

I have two Christmas cards to share with you today. Today I want to introduce a beautiful stamp: Adornment

First card, I use a non-Xmas tradition color. It doesn't always need to be red and green and gold. Blue and white. I die cut a circle and stamp Adornment with Sahara sand and the sentiment with midnight black, then adhere on die cut labels of pattern paper. Stamp the Bead border twice and the dots also from Crystalline 3 times with cloud white in the bottom card base. Adhere the focal point on card front. Add liquid pearl.

Here is a close up of the liquid pearl. It's really pretty.

This one is a tradition color. Red. A quick and easy card. Perfect to mass product during the most busy season. The note card is from Making memories I pull out of my stash. The red scallop border is all on the card. This ready to use note card saves a lot of time. I die cut a circle. Stamp the Adornment watermark ink and use white embossing powder. Stamp the sentiment. Adhere the circle on card front. Tie ribbon and twine.

Close up of the ribbon. Add a twine makes the embellishment really pops up.

Close up of the embossing adornment. White against red, wow, I just love the striking color.

-->
{Holiday Adornment} Finish size:
-->4¼”x5½”
Supplies:
Stamp:( Adornment, Holiday Cheer, Bead border,dots from Crystalline set)Penny Black, Pigment Ink:(Midnight Black, Sahara sand, Cloud white) Tsukineko, Pattern paper:(9861 Classic Prints) KI Memories, Cardstock: (White, Kraft,), Dies: (Labels, Circle) Spellbinders,  Accents: (White opal liquid pearl) Ranger industry

-->
{Let it snow} Finish size:4¼”x5½”
Supplies:
Stamp:( Adornment, sentiments
-->from Crystalline set)Penny Black, Pigment Ink:(Midnight Black)Tsukineko, Watermark ink:Tsukineko,  Card base:Making memories, Dies: (Circle) Spellbinders,  White embossing powder :Joann, Accents: (twine)May arts. (ribbon)Michaels

Jul 19, 2010

Christmas in August Day1

Hi everyone. I've been really busy on some project. I am sorry for the "quiet" few day of the blog.
I know it sounds early to make Christmas card in Summer. Hey, you will be surprised how fast time slips by and next thing you know, Christmas is right around the corner. Why not have a early start so you can focus on all the shopping, family and friends gathering or just enjoy the holiday without working hard in the studio.

Also Penny black will release the new Christmas designs at CHA 2010 next week. If you are there, make sure to stop by and check them out. Stay tuned for some exciting news on Penny black.
This week is all about Christmas. Today I want to show you a beautiful stamp:Crystal wreath. This one makes an elegant style card can wow all your girl friends. I use lots of embossing powder on this project. 
First I stamp Crystal wreath with watermark ink and use sparkle embossing powder. Mat it on Grey cardstock. Punch a hole and tie the ribbon. Adhere on card base. Stamp sentiment and apply Stickles here and there. Done~ easy breazy. 

You can see the embossed sparkle wreath in the close up.

The second one I stamp the Crystal wreath on light blue die-cut label. This is time I use white embossing powder. Mat on a slightly bigger die-cut white label as focal point. Cut a square of pattern paper, adhere on card base. Cut a slit on top of the card and thread the ribbon through. Adhere the focal point and glue the bow. Trim a small white cardstcok and punch one end with border punch. Stamp sentiment and adhere at right corner. Add gems on the wreath and beside the sentiment.

-->
Thank you so much for stopping by and hope you have a great week. 
{Crystal wreath Christmas}
Supplies:
Stamp:( Crystal wreath, Christmas flourish)Penny Black, Pigment Ink:(Midnight Black, Aspen Mist) Tsukineko,  Cardstock:(White, Gery) , Emboss powder: (Iridescent sparkle)Joann, Accents : (Ribbon, Gems) Michaels, (Platinum Stickles) Ranger industry
Finish size 4 ¼”x5 ½”
{Holiday Cheer}
Supplies:
Stamp:( Crystal wreath, Holiday Cheer) Penny Black, Pigment Ink:(Midnight Black) Tsukineko, Watermark ink - Tsukineko, Pattern paper:( The Linen Closet)Die cut with my view, Cardstock: (Light blue. White) , Dies: (Label 1)Spellbinders,  Border Punch: (Upper Crest)FIAKARS, Accents: White emboss powder (Joann), (Gems ,Ribbons) Michaels
Finish size 4 ¼”x5 ½”